Use this node from the SDK
Add it in Python with
pipeline.add(name="...").trigger(...). See the SDK reference.Core Functionality
- Start workflows automatically in response to external events across 17 supported integrations
- Select a trigger type, then pick a specific event within that integration (e.g., Gmail > New Email)
- Outputs structured event data (sender, subject, file name, etc.) that downstream nodes can consume
- Enable or disable automation per trigger without removing it from the workflow
- Schedule time-based runs using the Cron trigger with daily, weekly, monthly, or custom cron expressions
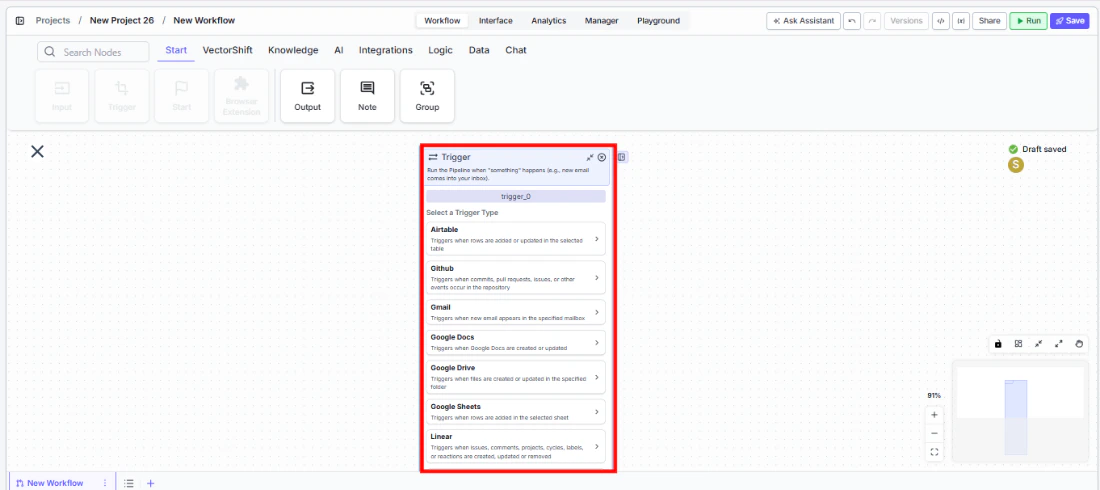
Supported Trigger Types
- Airtable — Triggers when rows are added or updated in the selected table
- GitHub — Triggers when commits, pull requests, issues, or other events occur in the repository
- Gmail — Triggers when new email appears in the specified mailbox
- Google Docs — Triggers when Google Docs are created or updated
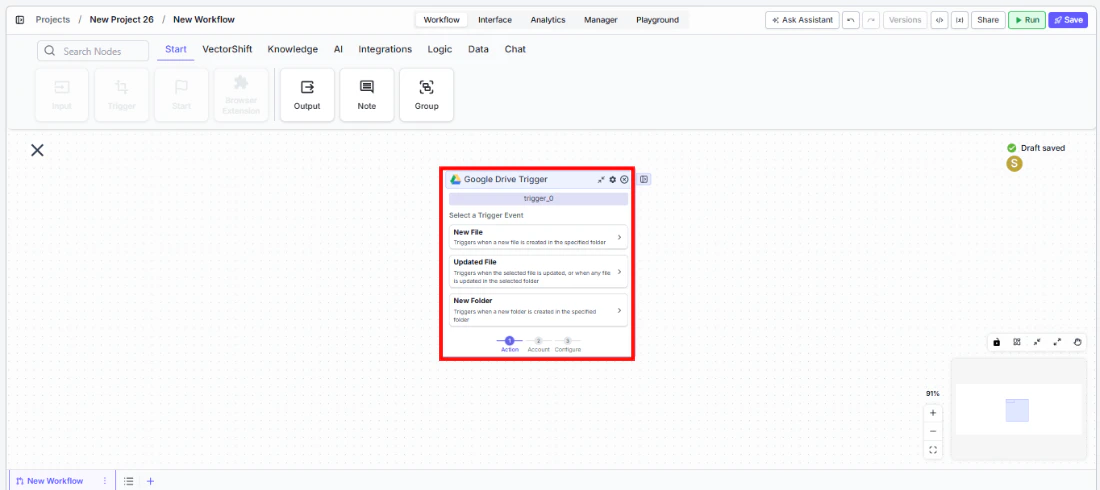
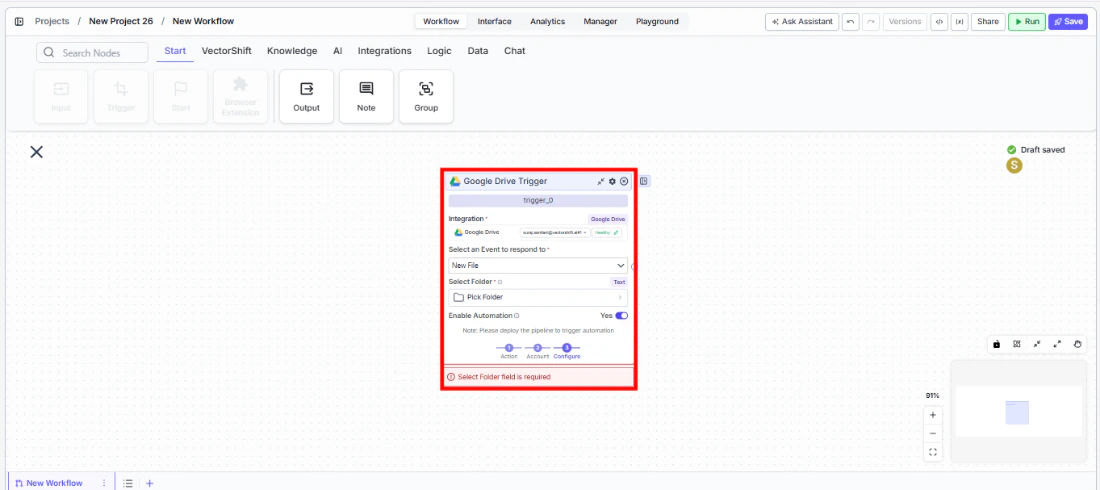
- Google Drive — Triggers when files are created or updated in the specified folder
- Google Sheets — Triggers when rows are added in the selected sheet
- Linear — Triggers when issues, comments, projects, cycles, labels, or reactions are created, updated, or removed
- Monday — Triggers when items are created, status changes, or column values update on a Monday board
- OneDrive — Triggers when files or folders are created or updated in the specified folder
- Outlook — Triggers when new email appears in the specified mailbox
- SharePoint — Triggers when files are created or updated in the specified folder
- Slack — Triggers when new message appears in the specified channel
- Teams — Triggers when messages are posted in Microsoft Teams channels or chats
- Typeform — Triggers when a new form submission is received
- Zendesk — Triggers when tickets are created or updated in your Zendesk account
- Cron — Triggers the workflow at specific intervals (daily, weekly, monthly, or custom cron expression)
Tool Inputs
Trigger Type* — (Selection list) Choose the integration to monitor. Selecting a type reveals event-specific settings and an integration connection field.Event* — (Enum (Dropdown)) The specific event within the selected trigger type (e.g., “New Email” for Gmail, “New Message” for Slack)Enable/Disable Automation— (Boolean, default:true) Turn the trigger on or off without removing it from the workflowIntegration* — (Integration) The connected account for the selected service (shown after selecting a trigger type)
- Gmail/Outlook: no additional inputs beyond the integration
- Slack:
Team,Channel - Google Drive/OneDrive/SharePoint: folder selection
- Cron:
Timezone,Time of Day,Day of Week,Day of Month, or custom cron expression - GitHub:
Owner,Repository, event type selection
Tool Outputs
Outputs vary by trigger type and event. Common output patterns include: Email triggers (Gmail, Outlook):email_id— (String) Unique identifier of the emailsubject— (String) Subject of the emailsender_email— (String) Email address of the senderrecipient_email— (String) Email address of the recipientreceived_time— (String) When the email was receivedcontents_of_email— (String) Contents of the emailattachments— (File[]) Attachments of the email
message— (String) The message contentuser_id— (String) Unique identifier of the message senderchannel_id/channel_name— (String) Channel informationattachments— (File[]) Files attached to the messagepermalink— (String) Direct link to the message
file_id— (String) Unique identifier of the filefile_name— (String) Name of the file
timestamp— (String) The timestamp when the trigger fired
- Workflows
Overview
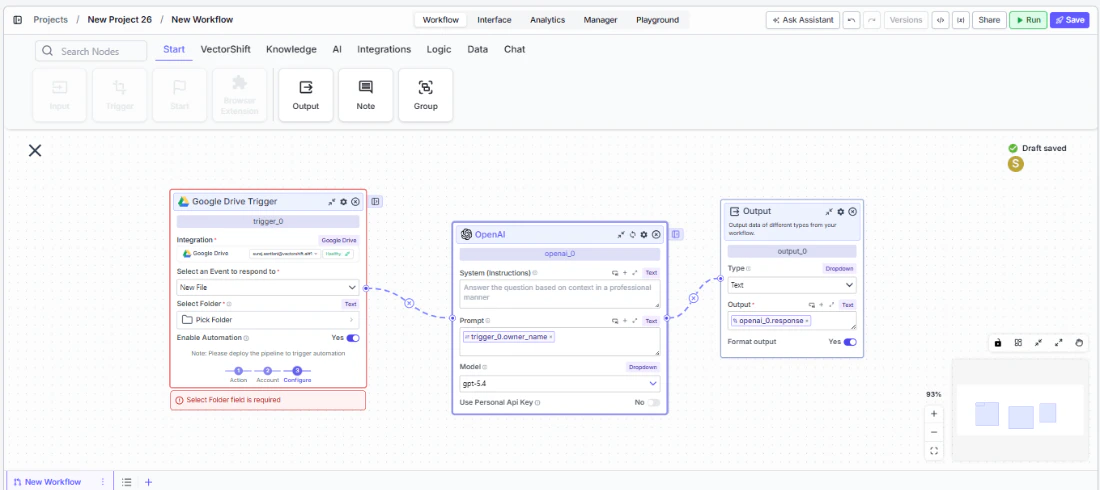
The Trigger node sits at the start of a workflow and automatically runs the workflow when the configured event fires. Each trigger type monitors a specific integration for changes and passes structured event data to downstream nodes for processing.Use Cases
- Automated invoice processing — Trigger on new Gmail attachments to extract invoice data, validate amounts, and update an ERP or spreadsheet.
- Real-time trade alert routing — Trigger on Slack messages in a trading channel to parse alerts, enrich with market data, and route to the appropriate team.
- Scheduled portfolio reporting — Use a Cron trigger to generate daily or weekly portfolio performance summaries and distribute via email.
- Document compliance monitoring — Trigger on Google Drive or SharePoint file updates to scan new documents for regulatory compliance keywords.
- Support ticket triage — Trigger on new Zendesk tickets to classify urgency, extract key details, and assign to the right agent queue.
How It Works
- Add the node to your workflow. From the toolbar, open the Start tab and drag the Trigger node onto the canvas.
- Select a trigger type. In the node panel, choose the integration you want to monitor (e.g., Gmail, Slack, Google Drive, Cron).
- Connect your integration. Authenticate with the selected service using the integration picker. This grants VectorShift permission to listen for events.
- Choose a specific event. Select the event that should fire the trigger (e.g., “New Email”, “New Message”, “New File”). Configure any additional fields the event requires (team, channel, folder, schedule, etc.).
- Wire the outputs. Connect the trigger’s output fields (email content, file IDs, message text, etc.) to downstream nodes in your workflow.
- Enable the trigger. Ensure
Enable/Disable Automationis set totrue, then save the workflow. The trigger is now active and will run the workflow automatically when the event occurs.
Settings
| Setting | Type | Default | Description |
|---|---|---|---|
Trigger Type | Selection list | — | The integration to monitor for events. |
Event | Dropdown | — | The specific event within the selected integration. |
Enable/Disable Automation | Boolean | true | Turn the trigger on or off. |
Integration | Integration picker | — | The authenticated account for the selected service. |
Timezone | Dropdown | UTC | Timezone for Cron triggers. |
Time of Day | String | 00:00 | Time of day for daily/weekly/monthly Cron triggers (HH:MM). |
Day of Week | Dropdown | Monday | Day for weekly Cron triggers. |
Day of Month | Integer | 1 | Day for monthly Cron triggers. |
Trigger on Weekends | Boolean | false | Include weekends for daily Cron triggers. |
Best Practices
- Use one trigger per workflow. Each workflow should have a single Trigger node at its start to keep event handling predictable.
- Test with the automation disabled first. Build and validate your downstream logic before enabling the trigger to avoid processing unexpected events.
- Filter events early. Use a Condition node immediately after the Trigger to discard irrelevant events (e.g., emails from specific senders) before heavier processing.
- Monitor Cron expressions carefully. Verify that custom cron expressions fire at the intended frequency to avoid excessive or missed runs.
- Keep integrations active. If an integration token expires or is revoked, the trigger will stop firing silently. Periodically verify your connected accounts.
Related Templates
CapEx Classification AI Agent
Classifies capital expenditure items against accounting standards and internal policies.
Application Risk Agent
Assesses risk levels in incoming applications using scoring models and policy rules.
Document Classification Agent
Automatically categorizes and tags incoming documents based on content and type.
Financial Statement Reconciliation Assistant
Reconciles financial statements by identifying mismatches and resolving discrepancies.