> ## Documentation Index
> Fetch the complete documentation index at: https://docs.vectorshift.ai/llms.txt
> Use this file to discover all available pages before exploring further.
# Workflow Node
> Run an existing workflow as a sub-step within another workflow or as a tool inside an agent.
Add it in Python with `pipeline.add(name="...").pipeline(...)`. See the SDK reference.
The Workflow node lets you run an existing workflow as a sub-step within your current workflow, or as a tool inside an agent. When you select a workflow, its input and output nodes are automatically exposed as input and output handles on the node. Use it to modularize complex workflows — for example, calling a document processing sub-workflow from a larger orchestration workflow, or giving an agent the ability to trigger a pre-built analytics workflow on demand.
## Core Functionality
* Run any deployed workflow as a sub-step within another workflow or as a tool in an agent
* Automatically inherit the selected workflow's inputs and outputs as node handles
* Create new workflows directly from the node configuration
* Pass data into the sub-workflow's inputs and receive its outputs for downstream use
## Tool Inputs
* `Workflow` \* — **Required** · Workflow selector · The deployed workflow to run. Once selected, the node dynamically generates input fields matching the sub-workflow's input nodes.
* Dynamic inputs — One input per input node defined in the selected workflow. Names and types match the sub-workflow's input configuration.
\* indicates a required field.
## Tool Outputs
* Dynamic outputs — One output per output node defined in the selected workflow. Names and types match the sub-workflow's output configuration.
The Workflow node uses the most recent **deployed** version of your sub-workflow. If you don't see the inputs and outputs you expect, make sure the sub-workflow has been deployed.
## Overview
When added as a tool inside an agent, the Workflow node (labeled "Run Workflow") lets the agent trigger an existing workflow during a conversation. The agent passes inputs to the workflow, waits for execution, and incorporates the workflow's outputs into its response. This is ideal for giving agents access to pre-built, deterministic processing workflows — such as running a calculation, generating a report, or executing a multi-step data transformation.
## Use Cases
* **On-demand report generation** — An agent triggers a report-building workflow when a user requests a financial summary, passing the date range and account as inputs.
* **Data processing on request** — An agent runs a CSV processing workflow when a user uploads a file, returning the cleaned and formatted results.
* **Calculation workflows** — An agent invokes a risk calculation workflow with portfolio parameters and returns the computed metrics to the user.
* **Document generation** — An agent triggers a document assembly workflow to produce contracts, proposals, or compliance reports from user-provided data.
* **Integration orchestration** — An agent runs a workflow that coordinates multiple API calls (e.g., fetching market data, running calculations, updating a CRM) as a single operation.
## How It Works
1. **Add the tool** — In the agent builder, open the tool panel and navigate to the **VectorShift** category. Select **Workflow** to add it as a tool.
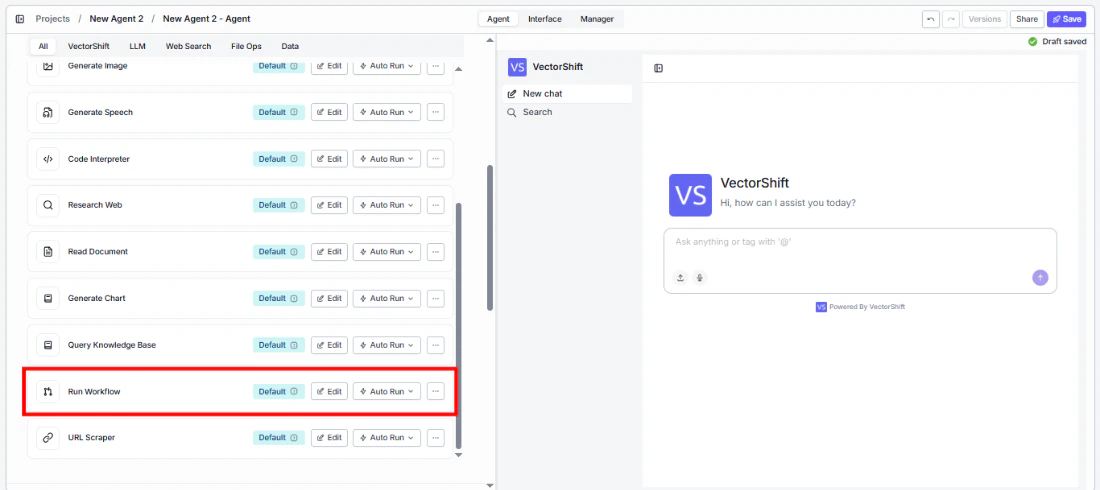 2. **Select the workflow** — Use the `Workflow` selector to choose the deployed workflow to run. Its inputs automatically appear as configurable fields.
3. **Configure input fields** — Each input from the selected workflow appears as a field. You can leave fields open for the agent to fill dynamically based on conversation context, or lock them to fixed values. Click the sparkle icon to switch a field between dynamic (agent-determined) and static (fixed) mode.
2. **Select the workflow** — Use the `Workflow` selector to choose the deployed workflow to run. Its inputs automatically appear as configurable fields.
3. **Configure input fields** — Each input from the selected workflow appears as a field. You can leave fields open for the agent to fill dynamically based on conversation context, or lock them to fixed values. Click the sparkle icon to switch a field between dynamic (agent-determined) and static (fixed) mode.
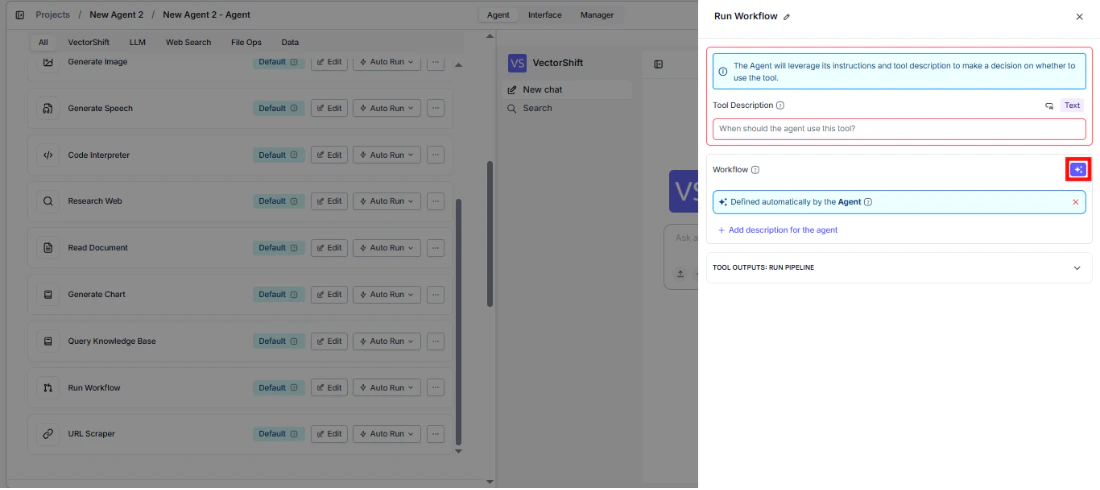 4. **Write a Tool Description** — Describe when and why the agent should run this workflow. Example: *"Use this tool to generate a portfolio performance report. Provide the client name and reporting period."*
5. **Set Auto Run behavior** — Choose how the tool executes:
* **Auto Run** — Runs the workflow immediately.
* **Require User Approval** — Pauses for user confirmation before running.
* **Let Agent Decide** — The agent determines whether approval is needed.
4. **Write a Tool Description** — Describe when and why the agent should run this workflow. Example: *"Use this tool to generate a portfolio performance report. Provide the client name and reporting period."*
5. **Set Auto Run behavior** — Choose how the tool executes:
* **Auto Run** — Runs the workflow immediately.
* **Require User Approval** — Pauses for user confirmation before running.
* **Let Agent Decide** — The agent determines whether approval is needed.
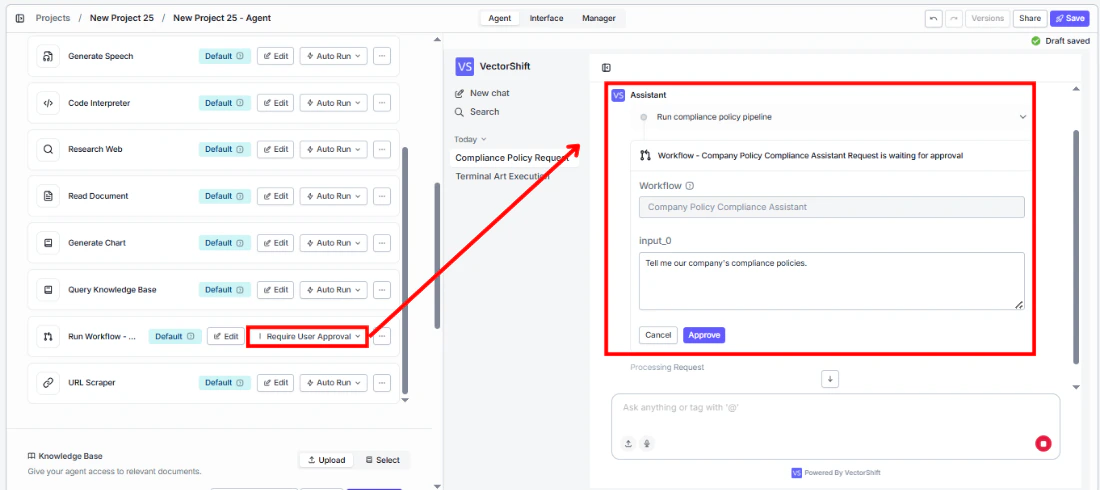 6. **Test the tool** — In the chat interface, trigger a request that should invoke the workflow and verify the results are returned correctly.
## Settings
* `Workflow` — Workflow selector · Default: none · The deployed workflow to run.
* Dynamic input fields — Generated from the selected workflow's input nodes.
* `Tool Description` — Text · Default: none · Describes the tool's purpose to the agent.
* `Auto Run` — Dropdown · Default: Auto Run · Controls execution behavior.
## Best Practices
* **Deploy before using** — The Workflow node runs the most recently deployed version of the sub-workflow. Always deploy your workflow after making changes to ensure the agent uses the latest version.
* **Write clear tool descriptions** — Include what the workflow does, what inputs it needs, and what outputs to expect. The agent uses this to decide when to invoke it.
* **Lock configuration inputs** — For inputs that should not vary (e.g., API keys, model settings, output formats), lock them to fixed values and only leave user-facing parameters open.
* **Use approval for side-effect workflows** — If the workflow performs write operations (sending emails, updating databases, creating records), set Auto Run to "Require User Approval".
* **Create dedicated workflows for agent use** — Design sub-workflows with clean, well-named inputs and outputs that make sense as agent tool parameters.
## Related Templates
Automatically generates structured investment memos from deal data and research inputs.
Compares two or more spreadsheets to identify discrepancies, changes, and anomalies.
Reviews closing packages for completeness, accuracy, and compliance before deal finalization.
Validates data and documents against predefined rules, schemas, or compliance standards.
## Common Issues
For troubleshooting and common issues, see the [Common Issues](/docs/common-issues) page.
## Overview
In workflows, the Workflow node lets you embed another workflow as a sub-step within your current workflow. This enables modular workflow design — you can break complex workflows into reusable components and compose them together. The node inherits the sub-workflow's inputs and outputs, letting you wire data in and out seamlessly.
## Use Cases
* **Modular workflow design** — Break a large financial processing workflow into reusable sub-workflows (data extraction, transformation, validation, output) and compose them using Workflow nodes.
* **Shared processing steps** — Use a common data cleaning workflow across multiple parent workflows without duplicating the logic.
* **Conditional workflow execution** — Route data to different sub-workflows based on conditions (e.g., different processing workflows for equities vs. fixed income).
* **Team collaboration** — Different team members build and maintain separate sub-workflows, which are composed into a master workflow using Workflow nodes.
## How It Works
1. **Add the node** — On the workflow canvas, open the node panel and navigate to the **VectorShift** category. Drag **Workflow** onto the canvas.
6. **Test the tool** — In the chat interface, trigger a request that should invoke the workflow and verify the results are returned correctly.
## Settings
* `Workflow` — Workflow selector · Default: none · The deployed workflow to run.
* Dynamic input fields — Generated from the selected workflow's input nodes.
* `Tool Description` — Text · Default: none · Describes the tool's purpose to the agent.
* `Auto Run` — Dropdown · Default: Auto Run · Controls execution behavior.
## Best Practices
* **Deploy before using** — The Workflow node runs the most recently deployed version of the sub-workflow. Always deploy your workflow after making changes to ensure the agent uses the latest version.
* **Write clear tool descriptions** — Include what the workflow does, what inputs it needs, and what outputs to expect. The agent uses this to decide when to invoke it.
* **Lock configuration inputs** — For inputs that should not vary (e.g., API keys, model settings, output formats), lock them to fixed values and only leave user-facing parameters open.
* **Use approval for side-effect workflows** — If the workflow performs write operations (sending emails, updating databases, creating records), set Auto Run to "Require User Approval".
* **Create dedicated workflows for agent use** — Design sub-workflows with clean, well-named inputs and outputs that make sense as agent tool parameters.
## Related Templates
Automatically generates structured investment memos from deal data and research inputs.
Compares two or more spreadsheets to identify discrepancies, changes, and anomalies.
Reviews closing packages for completeness, accuracy, and compliance before deal finalization.
Validates data and documents against predefined rules, schemas, or compliance standards.
## Common Issues
For troubleshooting and common issues, see the [Common Issues](/docs/common-issues) page.
## Overview
In workflows, the Workflow node lets you embed another workflow as a sub-step within your current workflow. This enables modular workflow design — you can break complex workflows into reusable components and compose them together. The node inherits the sub-workflow's inputs and outputs, letting you wire data in and out seamlessly.
## Use Cases
* **Modular workflow design** — Break a large financial processing workflow into reusable sub-workflows (data extraction, transformation, validation, output) and compose them using Workflow nodes.
* **Shared processing steps** — Use a common data cleaning workflow across multiple parent workflows without duplicating the logic.
* **Conditional workflow execution** — Route data to different sub-workflows based on conditions (e.g., different processing workflows for equities vs. fixed income).
* **Team collaboration** — Different team members build and maintain separate sub-workflows, which are composed into a master workflow using Workflow nodes.
## How It Works
1. **Add the node** — On the workflow canvas, open the node panel and navigate to the **VectorShift** category. Drag **Workflow** onto the canvas.
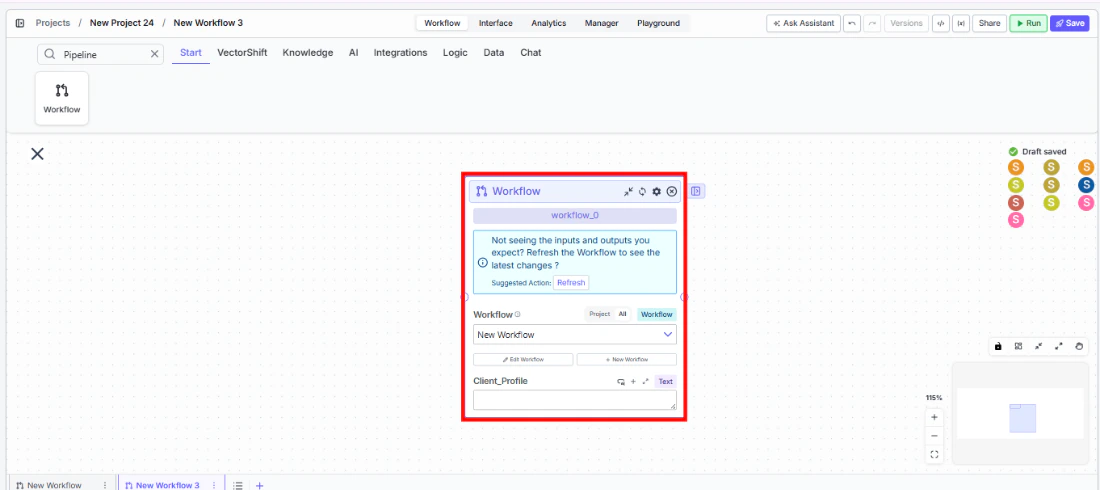 2. **Select or create a workflow** — Use the workflow selector to choose an existing deployed workflow, or click **Create Workflow** to build a new one. The creation dialog offers two options: start from scratch or use AI to generate a workflow from a description.
3. **Connect inputs** — Wire upstream node outputs to the Workflow node's input handles. Each handle corresponds to an input node in the selected sub-workflow.
4. **Connect outputs** — Wire the Workflow node's output handles to downstream nodes. Each handle corresponds to an output node in the sub-workflow.
2. **Select or create a workflow** — Use the workflow selector to choose an existing deployed workflow, or click **Create Workflow** to build a new one. The creation dialog offers two options: start from scratch or use AI to generate a workflow from a description.
3. **Connect inputs** — Wire upstream node outputs to the Workflow node's input handles. Each handle corresponds to an input node in the selected sub-workflow.
4. **Connect outputs** — Wire the Workflow node's output handles to downstream nodes. Each handle corresponds to an output node in the sub-workflow.
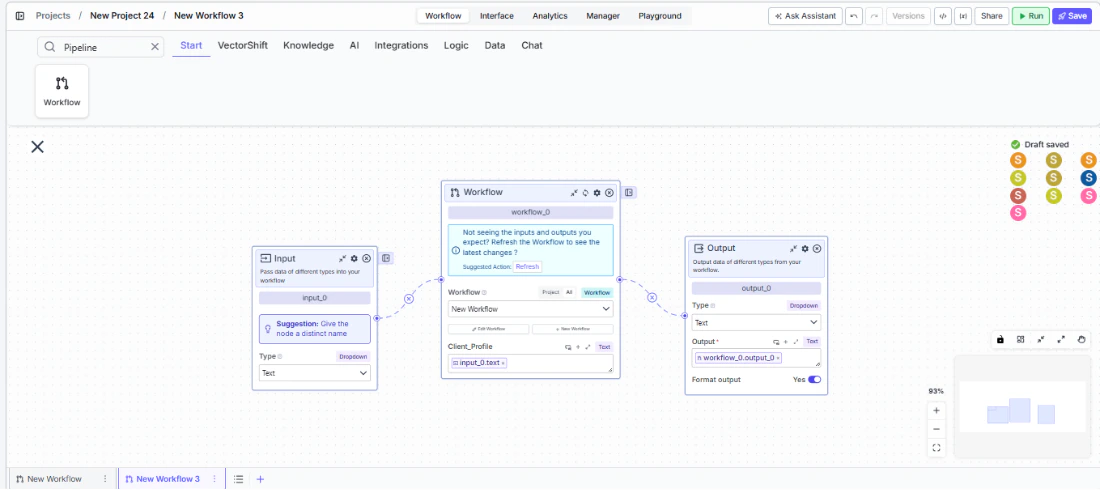 5. **Run the workflow** — Execute the workflow. The Workflow node runs the sub-workflow with the provided inputs and passes its outputs downstream.
## Settings
* `Workflow` — Workflow selector · **Required** · The deployed workflow to run as a sub-step.
* Dynamic input fields — Generated from the selected workflow's input nodes.
* Dynamic output fields — Generated from the selected workflow's output nodes.
## Best Practices
* **Deploy sub-workflows first** — The Workflow node uses the most recently deployed version. If inputs or outputs appear missing, redeploy the sub-workflow.
* **Keep sub-workflows focused** — Each sub-workflow should handle a single logical step. This makes them reusable and easier to debug.
* **Match input/output types** — Ensure the types of upstream outputs match the expected input types of the sub-workflow to avoid type-mismatch errors.
* **Use for abstraction, not duplication** — If you find yourself copying node configurations across workflows, extract the shared logic into a sub-workflow and use Workflow nodes to reference it.
* **Version control through deployment** — The Workflow node always runs the deployed version. You can safely edit a sub-workflow without affecting parent workflows until you redeploy.
## Related Templates
Automatically generates structured investment memos from deal data and research inputs.
Compares two or more spreadsheets to identify discrepancies, changes, and anomalies.
Reviews closing packages for completeness, accuracy, and compliance before deal finalization.
Validates data and documents against predefined rules, schemas, or compliance standards.
## Common Issues
For troubleshooting and common issues, see the [Common Issues](/docs/common-issues) page.
5. **Run the workflow** — Execute the workflow. The Workflow node runs the sub-workflow with the provided inputs and passes its outputs downstream.
## Settings
* `Workflow` — Workflow selector · **Required** · The deployed workflow to run as a sub-step.
* Dynamic input fields — Generated from the selected workflow's input nodes.
* Dynamic output fields — Generated from the selected workflow's output nodes.
## Best Practices
* **Deploy sub-workflows first** — The Workflow node uses the most recently deployed version. If inputs or outputs appear missing, redeploy the sub-workflow.
* **Keep sub-workflows focused** — Each sub-workflow should handle a single logical step. This makes them reusable and easier to debug.
* **Match input/output types** — Ensure the types of upstream outputs match the expected input types of the sub-workflow to avoid type-mismatch errors.
* **Use for abstraction, not duplication** — If you find yourself copying node configurations across workflows, extract the shared logic into a sub-workflow and use Workflow nodes to reference it.
* **Version control through deployment** — The Workflow node always runs the deployed version. You can safely edit a sub-workflow without affecting parent workflows until you redeploy.
## Related Templates
Automatically generates structured investment memos from deal data and research inputs.
Compares two or more spreadsheets to identify discrepancies, changes, and anomalies.
Reviews closing packages for completeness, accuracy, and compliance before deal finalization.
Validates data and documents against predefined rules, schemas, or compliance standards.
## Common Issues
For troubleshooting and common issues, see the [Common Issues](/docs/common-issues) page.