> ## Documentation Index
> Fetch the complete documentation index at: https://docs.vectorshift.ai/llms.txt
> Use this file to discover all available pages before exploring further.
# Listen — Capture
> Pause the conversation and wait for the user to respond, storing their message for downstream use.
Add it in Python with `pipeline.add(name="...").listen(...)`. See the SDK reference.
The Capture node (a variant of the Listen node) pauses the conversation at a specific step and waits for the user to type a response. The user's message is stored in the `response` output and passed to downstream nodes. Use it to build multi-step conversational flows — for example, asking a follow-up question after presenting information, collecting free-text feedback, or pausing for user confirmation before proceeding with an action.
## Core Functionality
* Pauses the conversational workflow at the current step and waits for the user to respond in the chat
* Captures the user's typed message and stores it in the `response` output variable
* Resumes the workflow and passes the captured response to downstream nodes
* Works with the Start node and other conversational nodes (Talk, Button) to build multi-step chat flows
## Tool Inputs
This node has no configurable input fields. It simply pauses and waits for user input.
## Tool Outputs
* `response` — Text. The user's message captured at this step in the conversation.
***
### Overview
In workflows, the Capture node acts as a pause point in a conversational workflow. When the flow reaches this node, the chatbot waits for the user to type a message. Once the user responds, the workflow resumes and the `response` output carries the user's text to the next node — typically an LLM for processing, a condition node for branching, or another conversational node. Use it between Talk nodes to create back-and-forth dialogue.
### Use Cases
* Pause after presenting a financial summary and capture the user's follow-up question for an LLM to answer
* Collect free-text feedback after completing a support interaction and route it to a sentiment analysis node
* Ask the user to confirm a transaction ("Please type CONFIRM to proceed") and validate their response with a condition node
* Gather additional context after an initial classification — e.g., "Can you describe the issue in more detail?"
* Build a multi-turn interview flow where each Capture node collects one answer before moving to the next question
### How It Works
#### Step 1: Add a Start Node
The Capture node requires a Start node on the canvas. If no Start node is present, a dialog appears: *"To use this node, drag a start node onto the canvas."* Add a Start node from the **Start** tab first.
#### Step 2: Add the Capture Node
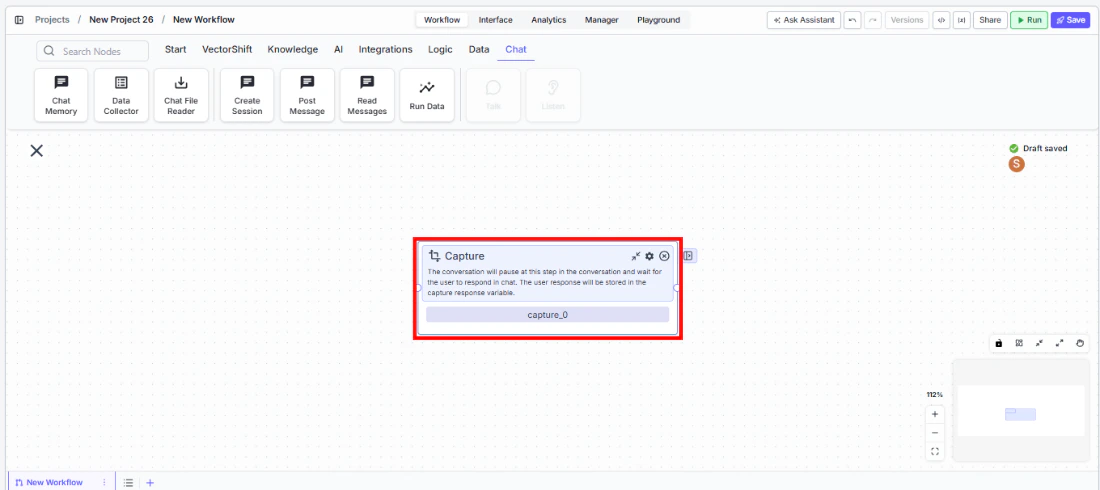
In the workflow canvas, click the **Chat** tab in the node palette, click **Listen**, then select **Capture** from the variant list. Drag it onto the canvas.
 #### Step 3: Connect Upstream Nodes
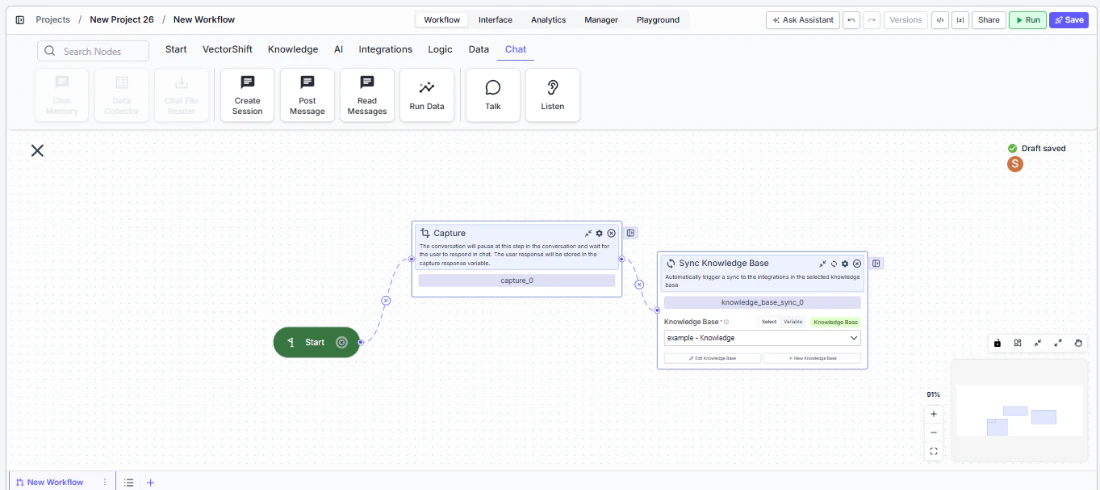 Connect the Capture node after a Talk (Message) node or other conversational node. The Capture node pauses the flow at this point and waits for the user's response.
#### Step 4: Connect the Response Output
Connect the `response` output to the downstream node that should process the user's message — for example, an LLM node, a condition node, or another Talk node.
#### Step 5: Test the Flow
Deploy the workflow as a chatbot. Verify that the conversation pauses at the Capture step and resumes correctly once the user sends a message.
### Settings
| Setting | Type | Default | Description |
| ------------------------------ | ------ | ------- | --------------------------------------------------------------------- |
| `Show Success/Failure Outputs` | Toggle | Off | Show additional success/failure output handles. **Advanced setting.** |
### Best Practices
* **Always precede Capture with a Talk node.** Users need context for what to type. Place a Talk (Message) node before the Capture to ask a clear question or provide instructions.
* **Use descriptive node names.** Rename the Capture node to describe what it collects (e.g., "Capture Feedback", "Capture Confirmation") so the workflow is easy to follow.
* **Validate captured input when needed.** If the user's response must meet specific criteria (e.g., a date format, a confirmation keyword), connect the `response` output to a condition node before proceeding.
* **Chain multiple Talk-Capture pairs.** For multi-step data collection, alternate Talk (Message) and Capture nodes to create a structured back-and-forth conversation.
* **Consider using Button instead for constrained choices.** If you need the user to pick from a fixed set of options rather than typing freely, use the Button variant of Listen instead.
### Related Templates
Handles common customer inquiries and support tickets through conversational AI.
Assists banking customers with account inquiries, transactions, and product questions.
Verifies customer identities and performs Know Your Customer checks for onboarding compliance.
Answers employee questions about internal policies and flags potential compliance issues.
### Common Issues
For help with common configuration issues, see the [Common Issues](/support) page.
Connect the Capture node after a Talk (Message) node or other conversational node. The Capture node pauses the flow at this point and waits for the user's response.
#### Step 4: Connect the Response Output
Connect the `response` output to the downstream node that should process the user's message — for example, an LLM node, a condition node, or another Talk node.
#### Step 5: Test the Flow
Deploy the workflow as a chatbot. Verify that the conversation pauses at the Capture step and resumes correctly once the user sends a message.
### Settings
| Setting | Type | Default | Description |
| ------------------------------ | ------ | ------- | --------------------------------------------------------------------- |
| `Show Success/Failure Outputs` | Toggle | Off | Show additional success/failure output handles. **Advanced setting.** |
### Best Practices
* **Always precede Capture with a Talk node.** Users need context for what to type. Place a Talk (Message) node before the Capture to ask a clear question or provide instructions.
* **Use descriptive node names.** Rename the Capture node to describe what it collects (e.g., "Capture Feedback", "Capture Confirmation") so the workflow is easy to follow.
* **Validate captured input when needed.** If the user's response must meet specific criteria (e.g., a date format, a confirmation keyword), connect the `response` output to a condition node before proceeding.
* **Chain multiple Talk-Capture pairs.** For multi-step data collection, alternate Talk (Message) and Capture nodes to create a structured back-and-forth conversation.
* **Consider using Button instead for constrained choices.** If you need the user to pick from a fixed set of options rather than typing freely, use the Button variant of Listen instead.
### Related Templates
Handles common customer inquiries and support tickets through conversational AI.
Assists banking customers with account inquiries, transactions, and product questions.
Verifies customer identities and performs Know Your Customer checks for onboarding compliance.
Answers employee questions about internal policies and flags potential compliance issues.
### Common Issues
For help with common configuration issues, see the [Common Issues](/support) page.