> ## Documentation Index
> Fetch the complete documentation index at: https://docs.vectorshift.ai/llms.txt
> Use this file to discover all available pages before exploring further.
# Create Session
> Create a new session with an agent and participants from within a workflow.
Add it in Python with `pipeline.add(name="...").create_session(...)`. See the SDK reference.
 The Create Session node creates a new conversational session with a specified agent from within a workflow. Use it to programmatically spin up agent chat sessions — for example, initializing a client onboarding session when a new lead comes in, starting an automated compliance review conversation, or creating a support session that a human agent can later join.
## Core Functionality
* Creates a new agent session programmatically from within a workflow
* Links the session to a specific agent selected from your account
* Returns a session ID that downstream nodes (Post Message, Read Messages) can use to interact with the session
* Supports optional session naming for easier identification
## Tool Inputs
* `Session Name` — Text. Optional. A human-readable name for the session. Placeholder: "Optional session name".
* `Agent` \* — Agent. Required. The agent to use for the session. Select from existing agents in your account via a searchable dropdown, or switch to Variable mode to pass an agent reference dynamically. Includes a **+ New Agent** button to create a new agent inline.
\* *Required field*
## Tool Outputs
* `session_id` — Text. The unique identifier of the created session. Use this to post messages or read messages in downstream nodes.
***
### Overview
In workflows, the Create Session node initializes a new agent conversation that other Chat nodes can interact with. It outputs a `session_id` that you pass to Post Message and Read Messages nodes to send messages to and receive responses from the agent. This enables workflows that orchestrate multi-turn agent conversations programmatically — useful for automated testing, batch processing, or triggering agent interactions from external events.
### Use Cases
* Automatically create a client onboarding session when a new CRM record is created, then post introductory questions via Post Message
* Spin up a compliance review session for each new transaction, feed the transaction details, and read the agent's assessment
* Orchestrate automated QA testing of an agent by creating sessions and posting scripted test messages
* Initialize a financial analysis session from a trigger node when new market data arrives, then read the agent's insights
* Create named sessions for each department's weekly reporting workflow so conversations are easy to track and audit
### How It Works
#### Step 1: Add the Create Session Node
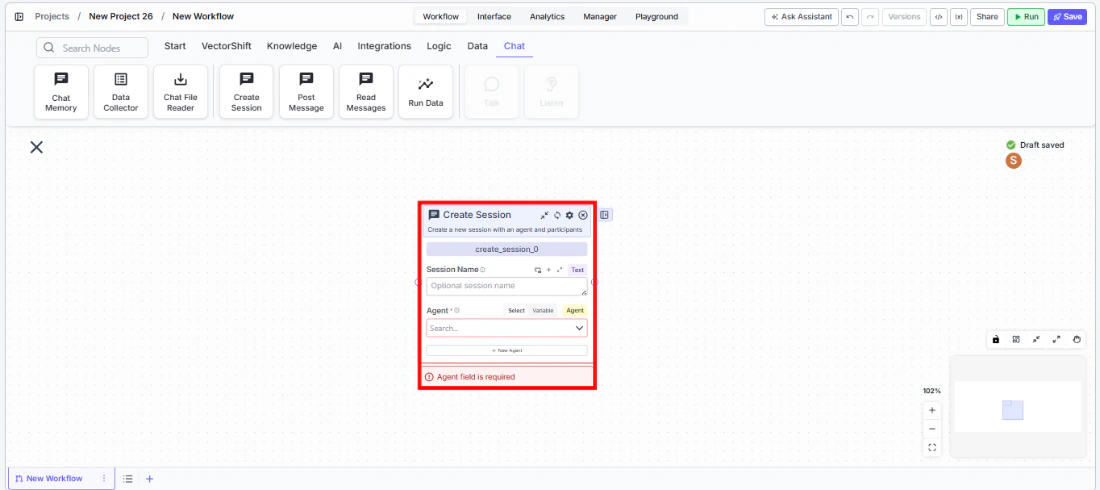
In the workflow canvas, click the **Chat** tab in the node palette and click **Create Session**. Drag it onto the canvas.
The Create Session node creates a new conversational session with a specified agent from within a workflow. Use it to programmatically spin up agent chat sessions — for example, initializing a client onboarding session when a new lead comes in, starting an automated compliance review conversation, or creating a support session that a human agent can later join.
## Core Functionality
* Creates a new agent session programmatically from within a workflow
* Links the session to a specific agent selected from your account
* Returns a session ID that downstream nodes (Post Message, Read Messages) can use to interact with the session
* Supports optional session naming for easier identification
## Tool Inputs
* `Session Name` — Text. Optional. A human-readable name for the session. Placeholder: "Optional session name".
* `Agent` \* — Agent. Required. The agent to use for the session. Select from existing agents in your account via a searchable dropdown, or switch to Variable mode to pass an agent reference dynamically. Includes a **+ New Agent** button to create a new agent inline.
\* *Required field*
## Tool Outputs
* `session_id` — Text. The unique identifier of the created session. Use this to post messages or read messages in downstream nodes.
***
### Overview
In workflows, the Create Session node initializes a new agent conversation that other Chat nodes can interact with. It outputs a `session_id` that you pass to Post Message and Read Messages nodes to send messages to and receive responses from the agent. This enables workflows that orchestrate multi-turn agent conversations programmatically — useful for automated testing, batch processing, or triggering agent interactions from external events.
### Use Cases
* Automatically create a client onboarding session when a new CRM record is created, then post introductory questions via Post Message
* Spin up a compliance review session for each new transaction, feed the transaction details, and read the agent's assessment
* Orchestrate automated QA testing of an agent by creating sessions and posting scripted test messages
* Initialize a financial analysis session from a trigger node when new market data arrives, then read the agent's insights
* Create named sessions for each department's weekly reporting workflow so conversations are easy to track and audit
### How It Works
#### Step 1: Add the Create Session Node
In the workflow canvas, click the **Chat** tab in the node palette and click **Create Session**. Drag it onto the canvas.
 #### Step 2: Select an Agent
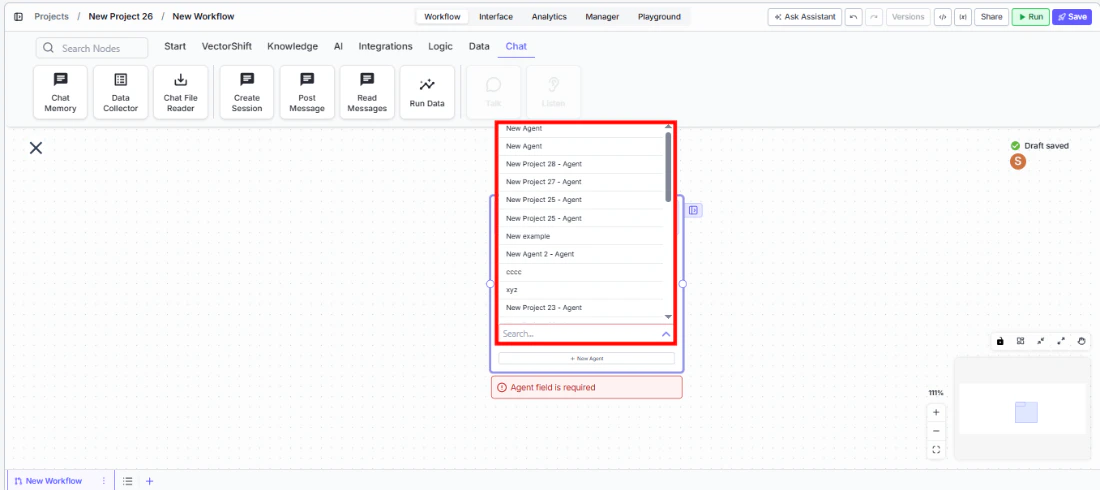
In the `Agent` field, use the searchable dropdown to select an existing agent from your account. This field is required — the node shows a validation error ("Agent field is required") if left empty.
You can toggle between **Select** mode (pick from a dropdown) and **Variable** mode (pass an agent reference from an upstream node). The **+ New Agent** button lets you create a new agent directly from within the node.
#### Step 3: Set a Session Name (Optional)
Enter a name in the `Session Name` field to give the session a human-readable label. This is optional but helpful for tracking sessions in logs or dashboards.
#### Step 4: Connect Downstream Nodes
#### Step 2: Select an Agent
In the `Agent` field, use the searchable dropdown to select an existing agent from your account. This field is required — the node shows a validation error ("Agent field is required") if left empty.
You can toggle between **Select** mode (pick from a dropdown) and **Variable** mode (pass an agent reference from an upstream node). The **+ New Agent** button lets you create a new agent directly from within the node.
#### Step 3: Set a Session Name (Optional)
Enter a name in the `Session Name` field to give the session a human-readable label. This is optional but helpful for tracking sessions in logs or dashboards.
#### Step 4: Connect Downstream Nodes
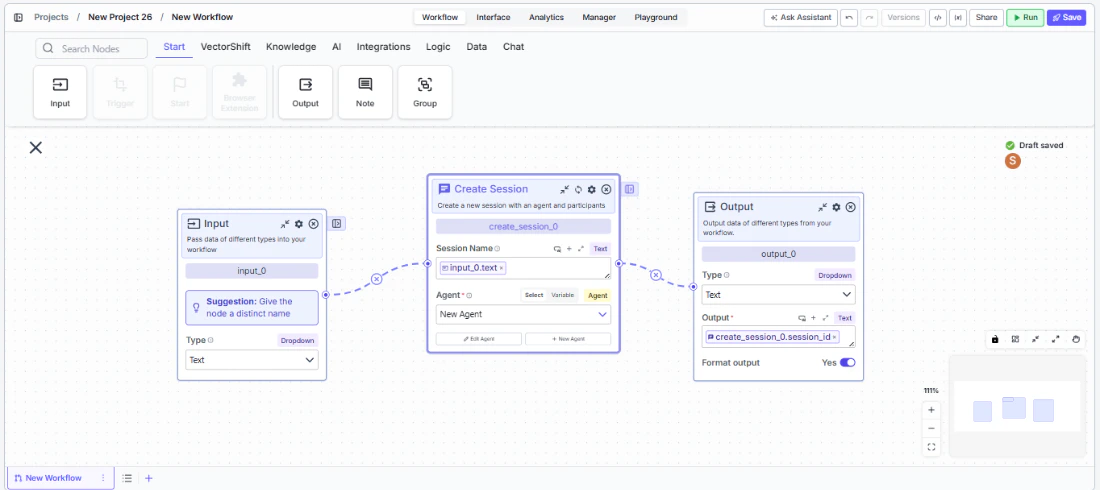 Connect the `session_id` output to downstream Post Message or Read Messages nodes. These nodes use the session ID to interact with the newly created agent session.
#### Step 5: Test the Workflow
Click **Run** to test. The node creates a session and outputs the session ID. Verify that downstream nodes can successfully post to and read from the session.
### Settings
| Setting | Type | Default | Description |
| ------------------------------ | ----------- | ------- | --------------------------------------------------------------------------- |
| `Session Name` | Text | — | Optional human-readable name for the session. |
| `Agent` | Agent | — | The agent to use. Required. |
| `Show Success/Failure Outputs` | Toggle | Off | Show additional success/failure output handles. **Advanced setting.** |
| `Dependencies` | List\ | — | Specify node dependencies to control execution order. **Advanced setting.** |
### Best Practices
* **Name sessions descriptively.** Use session names that include context (e.g., client name, date, workflow type) so sessions are easy to find and audit later.
* **Pair with Post Message and Read Messages.** Create Session alone only initializes the conversation — use Post Message to send input and Read Messages to retrieve the agent's responses.
* **Use Variable mode for dynamic agent selection.** When building workflows that route to different agents based on conditions (e.g., different departments), switch the Agent field to Variable mode and connect it to upstream logic.
* **Add dependencies for execution ordering.** If the session must be created after another node completes (e.g., after fetching client data), use the Dependencies advanced setting to enforce the correct order.
* **Store session IDs for follow-up workflows.** If you need to continue a conversation later (e.g., in a subsequent workflow run), save the session ID output to a database or variable for reuse.
### Related Templates
Handles common customer inquiries and support tickets through conversational AI.
Assists banking customers with account inquiries, transactions, and product questions.
Handles investor inquiries related to portfolios, statements, and fund performance.
Answers employee questions about internal policies and flags potential compliance issues.
### Common Issues
For help with common configuration issues, see the [Common Issues](/support) page.
Connect the `session_id` output to downstream Post Message or Read Messages nodes. These nodes use the session ID to interact with the newly created agent session.
#### Step 5: Test the Workflow
Click **Run** to test. The node creates a session and outputs the session ID. Verify that downstream nodes can successfully post to and read from the session.
### Settings
| Setting | Type | Default | Description |
| ------------------------------ | ----------- | ------- | --------------------------------------------------------------------------- |
| `Session Name` | Text | — | Optional human-readable name for the session. |
| `Agent` | Agent | — | The agent to use. Required. |
| `Show Success/Failure Outputs` | Toggle | Off | Show additional success/failure output handles. **Advanced setting.** |
| `Dependencies` | List\ | — | Specify node dependencies to control execution order. **Advanced setting.** |
### Best Practices
* **Name sessions descriptively.** Use session names that include context (e.g., client name, date, workflow type) so sessions are easy to find and audit later.
* **Pair with Post Message and Read Messages.** Create Session alone only initializes the conversation — use Post Message to send input and Read Messages to retrieve the agent's responses.
* **Use Variable mode for dynamic agent selection.** When building workflows that route to different agents based on conditions (e.g., different departments), switch the Agent field to Variable mode and connect it to upstream logic.
* **Add dependencies for execution ordering.** If the session must be created after another node completes (e.g., after fetching client data), use the Dependencies advanced setting to enforce the correct order.
* **Store session IDs for follow-up workflows.** If you need to continue a conversation later (e.g., in a subsequent workflow run), save the session ID output to a database or variable for reuse.
### Related Templates
Handles common customer inquiries and support tickets through conversational AI.
Assists banking customers with account inquiries, transactions, and product questions.
Handles investor inquiries related to portfolios, statements, and fund performance.
Answers employee questions about internal policies and flags potential compliance issues.
### Common Issues
For help with common configuration issues, see the [Common Issues](/support) page.